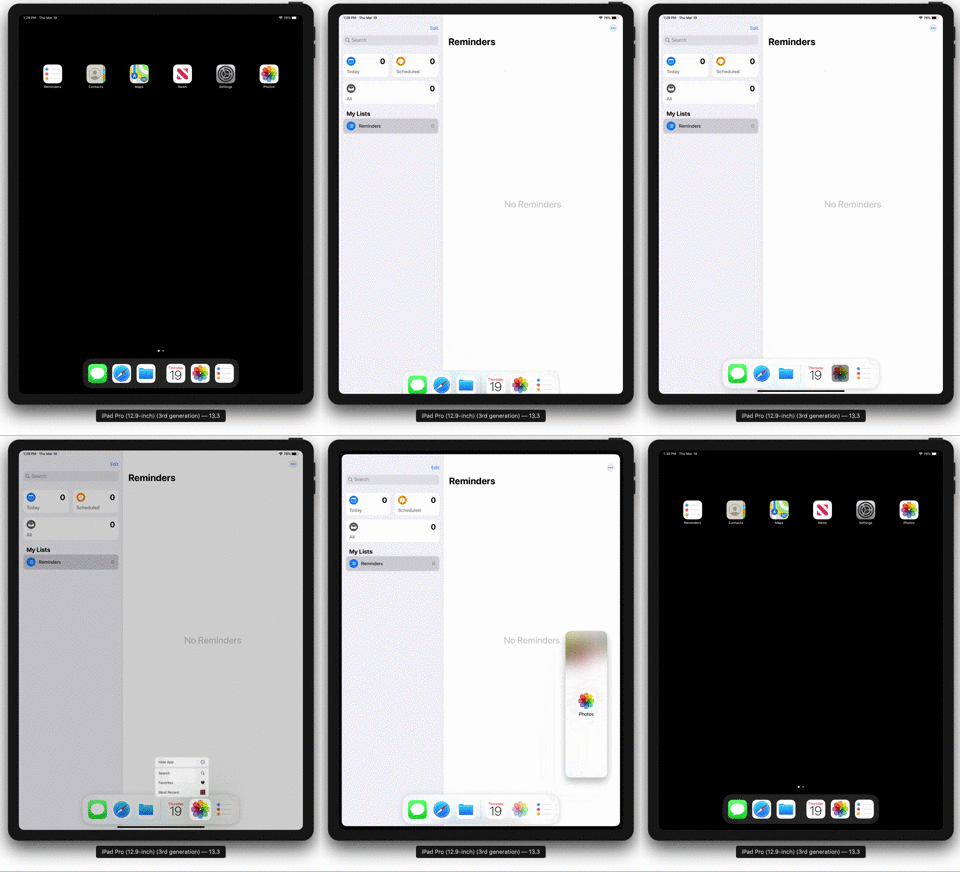
iPad Pros run a slightly different version of iOS called 'iPadOS', and this version of iOS comes with several really useful features. Probably my favorite is the ability to run two apps side-by-side. This is called Split View Multitasking by Apple, and getting it going involves a fair bit of gestural control for the user. Here's how a user would turn on Split View:
- Open the first app they want to work with
- Show the multitasking dock (using a slow short swipe up from the bottom edge)
- Touch, hold, and drag the icon of the second app they want to work with to the right edge of the screen
Check out: Guide to Choosing Between Appium and XCTest (UI) for iOS App Testing
From this point on, the two apps will be conjoined in Split View until the user drags the app separator all the way to the edge of the screen, turning Split View off. Of course, both apps must be designed to support split view for this to work. Let's now discuss how we can walk through this same series of steps with Appium to get ourselves into Split View mode, and further be able to automate whichever app of the two we desire. Unfortunately, there's no single command to make this happen, and we have to use a lot of tricky techniques to mirror the appropriate user behavior. Basically, we need to worry about these things:
- Ensuring both apps have been opened recently enough to show up in the dock
- Executing the correct gestures to show the dock and drag the app icon to trigger Split View
- Telling Appium which of the apps in the Split View we want to work with at any given moment
- Dragging the split to the side when we want to close out Split View
Also check: Guide to Cross-Platform Mobile Test Automation Using Appium
In this article, we're going to describe how to achieve steps 1-3, and I'll leave step 4 as an exercise for you (or as the subject of a future post).
Ensuring apps are in the dock
For our strategy to work, we need the icon of the app we want to open in Split View in the dock. The best way to make this happen is to ensure that it has been launched recently--in fact, most recently apart from the currently-running app. Let's take a look at the setup for an example where we'll load up both Reminders and Photos in Split View. In our case, we'll want Reminders on the left and Photos on the right. Because we're going to open up Photos on the right, we'll actually launch it first in our test, so that we can close it down, open up Reminders, and then open up Photos as the second app.
Read: Appium for Mobile Testing Infrastructure Setup
In this setUp method, we also construct a WebDriverWait, and store the screen dimensions on a member field, because we'll end up using them frequently. When we begin our test, the Photos app will be open. What we want to do next is actually terminate Photos, and launch Reminders. At this point, we've launched both the apps we want to work with, so they are both the most recently-launched apps, and will both show up in the recent apps section of the dock. Then, we go back to the Home Screen, so that the dock is visible:
Also read: Facts to Note About Using Appium for Desktop Applications
The reason we need to do this is one of the tricky points of this whole exercise. If an app is open, then the icons on the dock are not accessible to Appium for automation. However, on the Home Screen, the dock icons are accessible. What we want to do is take advantage of the fact that Photos and Reminders have both been opened recently, so we know their icons will be in the dock. Furthermore, we know that, as long as we don't open up any other apps, their icons will be in the same spot when we eventually show the dock later. Because we know they'll be in the same spot, we'll be able to use the position of the Photos dock icon on the Home Screen as a guarantee of where the Photos dock icon will be when we have Reminders open.
In the next stage of this flow, we figure out where the Photos icon is, and save that information for later. Then we re-launch Reminders, so that it is active and ready to share the screen with Photos.
There is an interesting helper method here. getDockIconRect just takes an app name, and returns the position of its dock icon in the screen:
Here we use an xpath query to ensure that the element we retrieve is actually the dock icon and not the home screen icon. Then, we return the screen rectangle representing that element, so that we can use it later.
Check: Writing an Appium Test in Kotlin
Showing the dock and entering Split View
At this point we are ready to call a special helper method designed to slowly drag the dock up in preparation for running the Split View gesture:
Basically, we show the dock, then wait a bit for it to cool down and settle in its place. What's the implementation we're working with?
Well, hello! It's our old friend swipe from Edition 107! We're re-using it here to perform a slow swipe from the middle bottom of the screen, up just far enough to show the dock. Now that the dock is shown, we can actually enter Split View. To do that, we make use of a special iOS-specific method mobile: dragFromToForDuration, which enables us to perform a touch-and-hold on the location of the Photos dock icon, then drag it to the right side of the screen. We wrap this up in a helper method called dragElement. The usage and implementation are as follows:
Essentially, we take the rect of a dock icon, pass in the ending x and y coordinate percentages, and the duration of the "hold" portion of the gesture. The dragElement helper converts these to the appropriate coordinates, and calls the mobile: method.
Working with simultaneously-open apps
At this stage in our flow, we've got both apps open in Split View! But if we take a look at the page source, we'll find that we only see the elements for one of the apps. And in fact, we can only work with one app's elements at a time. We can, however, tell Appium which app we want to work with, by updating the defaultActiveApplication setting to the bundle ID of whichever app you want to work with:
In the code above, you can see how we call driver.setSetting, with the appropriate setting name and bundle ID. After doing this for a given app, we can find elements within that app, and of course we can switch to any other app if we want as well.
So that's how we can enter into Split View and automate each app on the screen! Don't forget to check out the full code example for the full context.


.png)


-1280X720-Final-2.jpg)


