


Audio Setup - Bluetooth Setup and Limitations
Bluetooth Setup and Limitations
Overview
HeadSpin provides two-way audio testing capabilities even with devices that are in remote locations and not physically in-hand for testers.
HeadSpin provides this audio support via our proprietary Bluetooth hardware, HSBT (HeadSpin Bluetooth). This hardware appears to the phone as a normal Bluetooth headset; the audio to and from the headset is then streamed to the end user's browser so they can remotely listen to and record audio from the phone. Each phone or mobile device with audio enabled must be correctly paired with this Bluetooth device. (For the sake of clarity, please note that throughout the rest of this document, the term ‘Bluetooth device’ will refer to this custom hardware, not the mobile device or phone interacting with Bluetooth audio.) Once paired you can interact with a testing device’s audio using your computer speakers and microphone.
Although this Bluetooth solution provides complete audio functionality, it is not a one-to-one replacement for physical audio. Those differences are outlined below in the “Bluetooth Profiles and Limitations” section of this document.
Audio User Interface
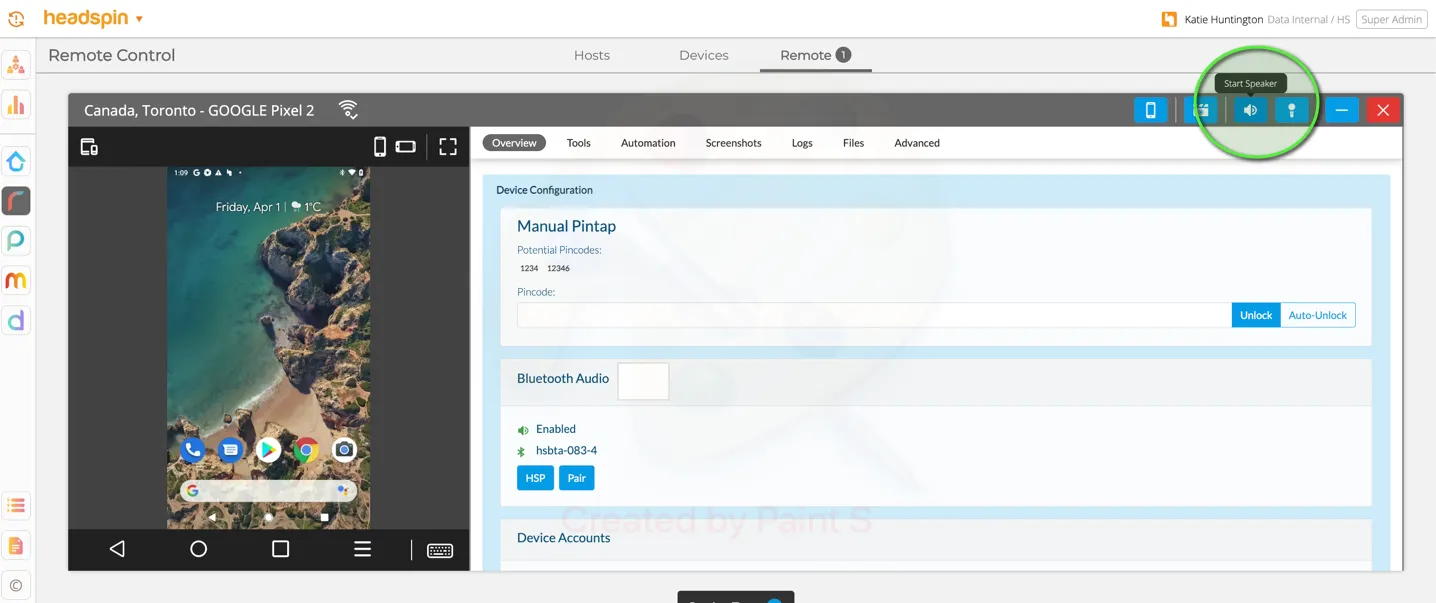
To enable audio playback and/or recording on a device, use the speaker and microphone buttons in the top right corner of the Remote Control view of your chosen device.
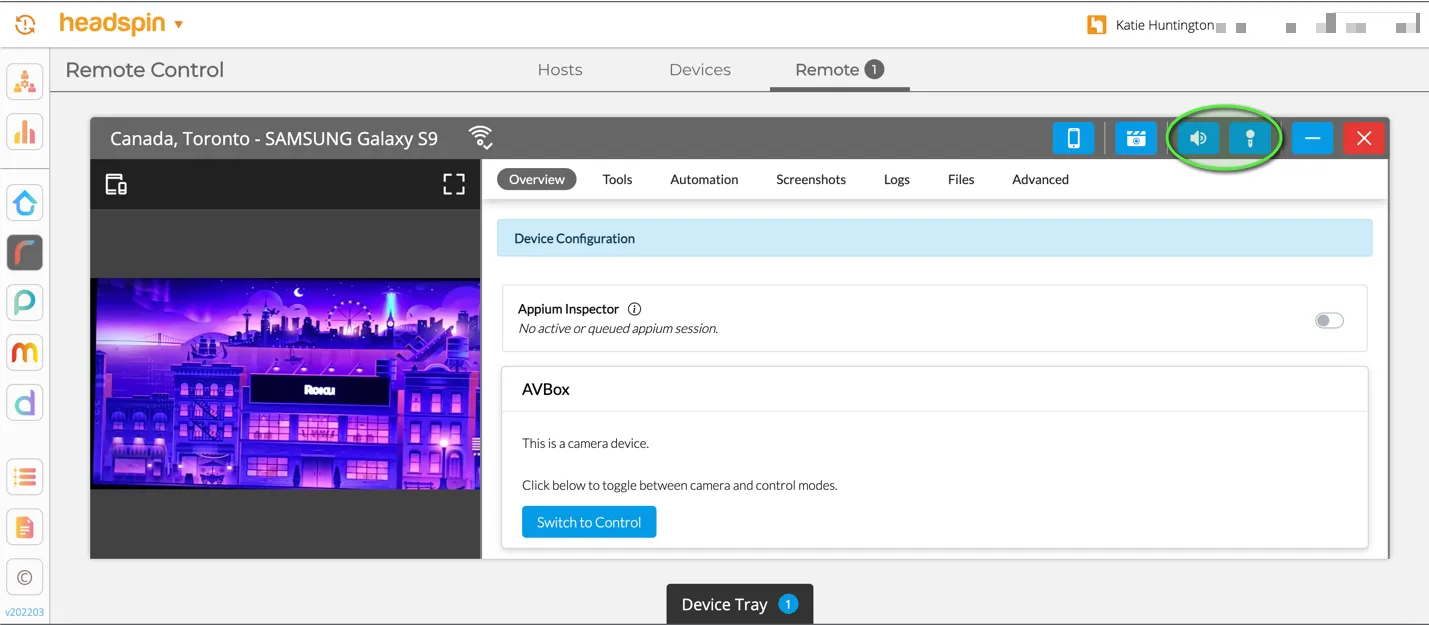
When these microphone and speaker icons are active it means that your audio streaming connection with the HeadSpin servers is functional–however, this does not necessarily mean your audio link with the device is fully working. For audio to work, you also need to have the Bluetooth system properly paired with the device (more on pairing below).
Once your device is successfully set up for use with audio, you will see a speaker icon beside the device in the Remote Control > Devices list, as shown below:
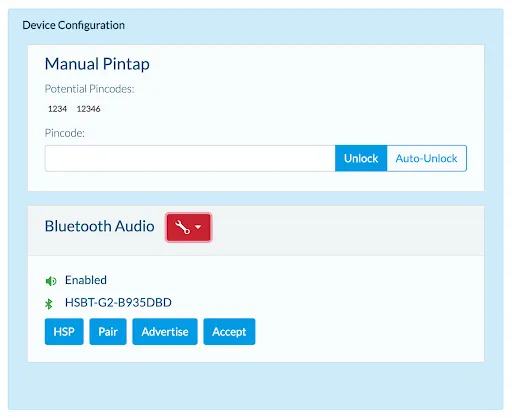
A successfully set up device for use with HSBT will typically look like this:
To access the controls and settings options for Bluetooth in the HeadSpin UI, you can navigate to either of two locations:
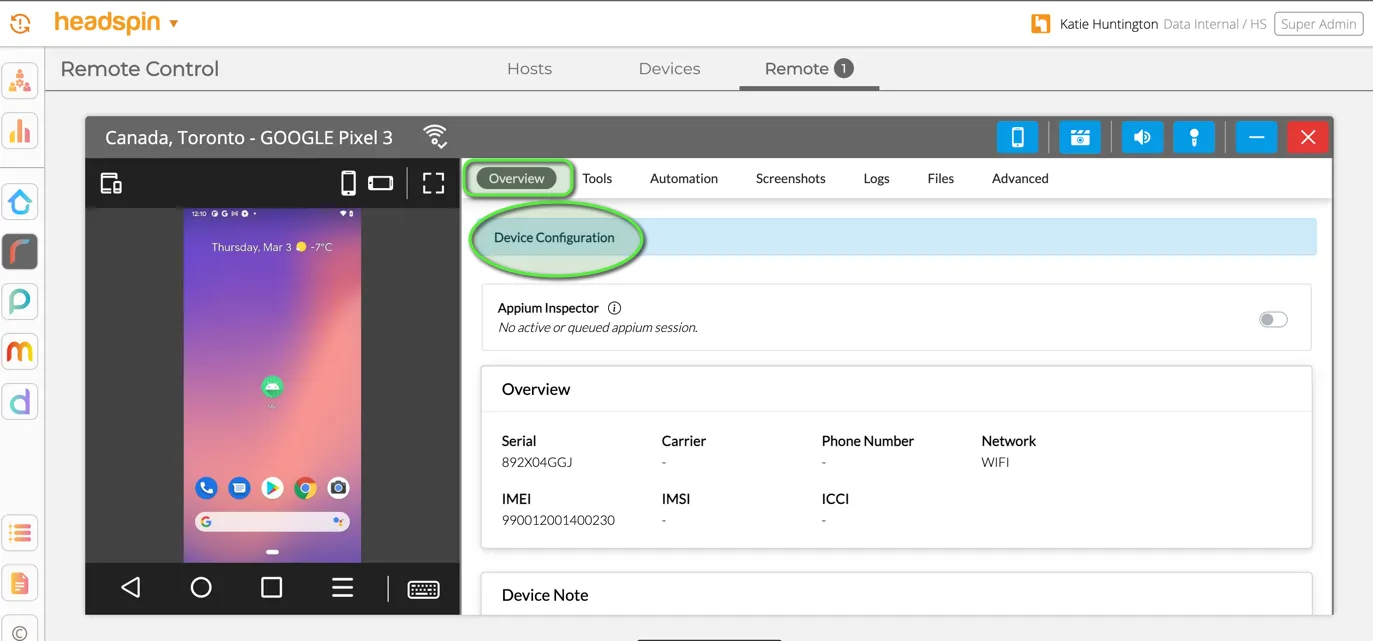
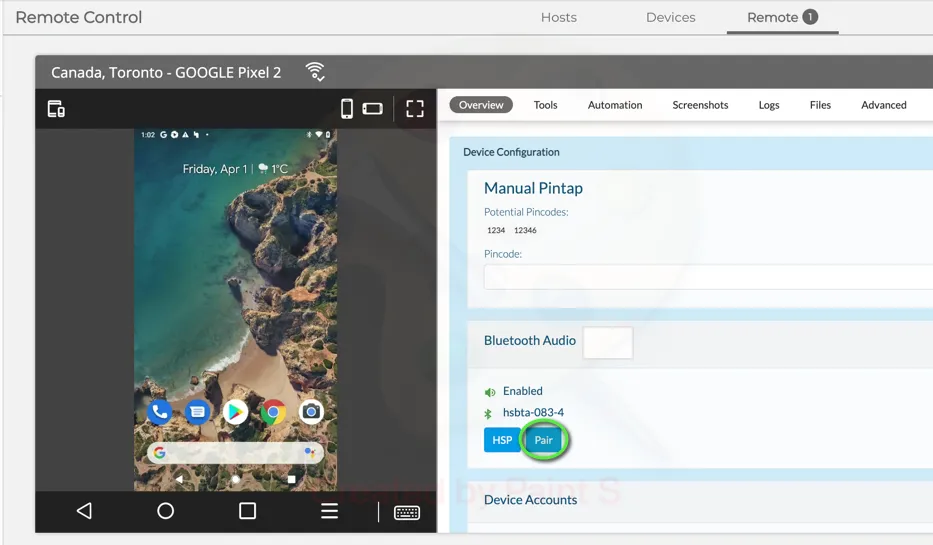
1. The Overview tab of a device’s Remote Control view. To access Bluetooth options from here, click on the “Device Configuration” interactive header at the top of the Overview panel window.

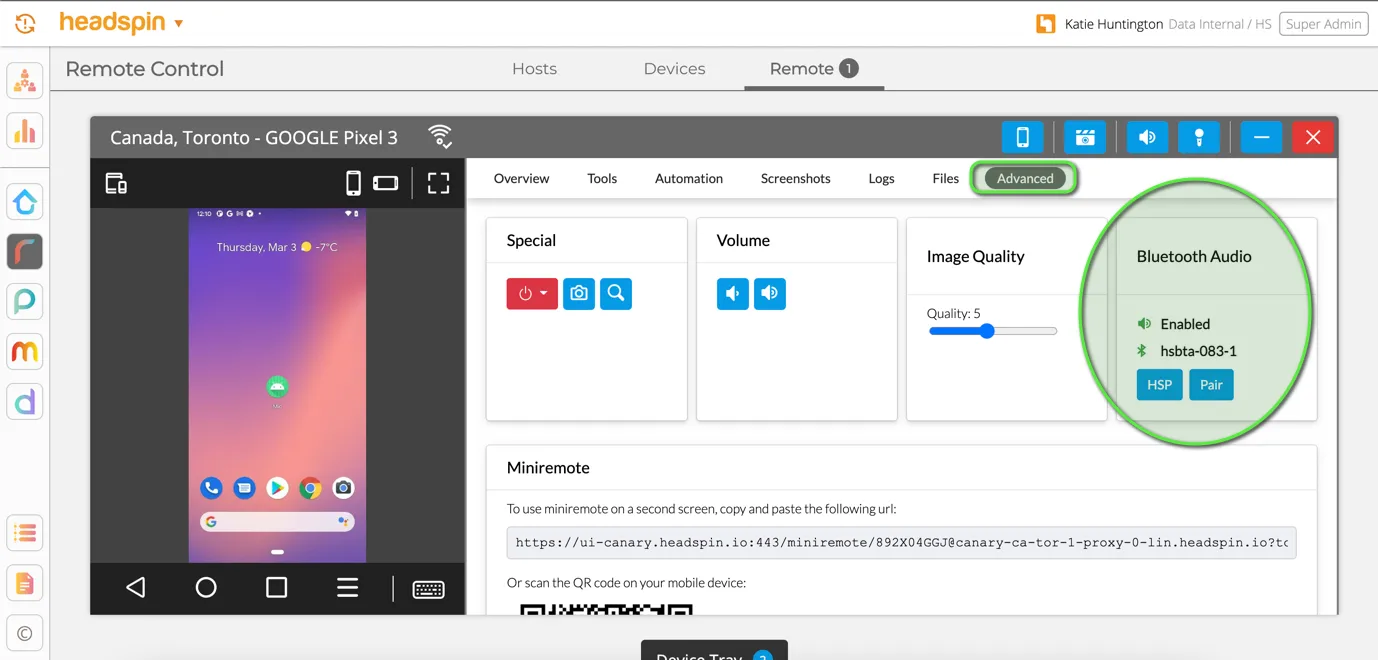
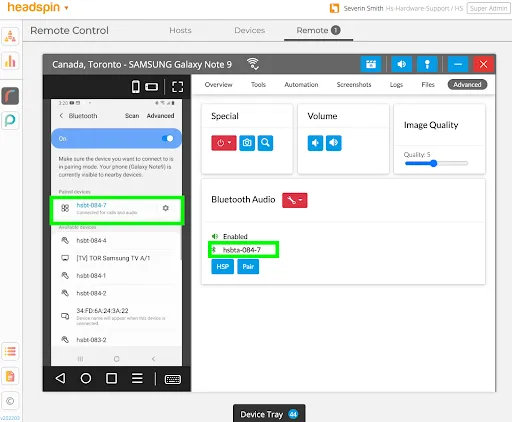
2. The Advanced tab of a device’s remote control panel, in the box labeled “Bluetooth Audio”.
Either method of navigation will offer the same Bluetooth options.
The available Bluetooth UI controls are as follows:
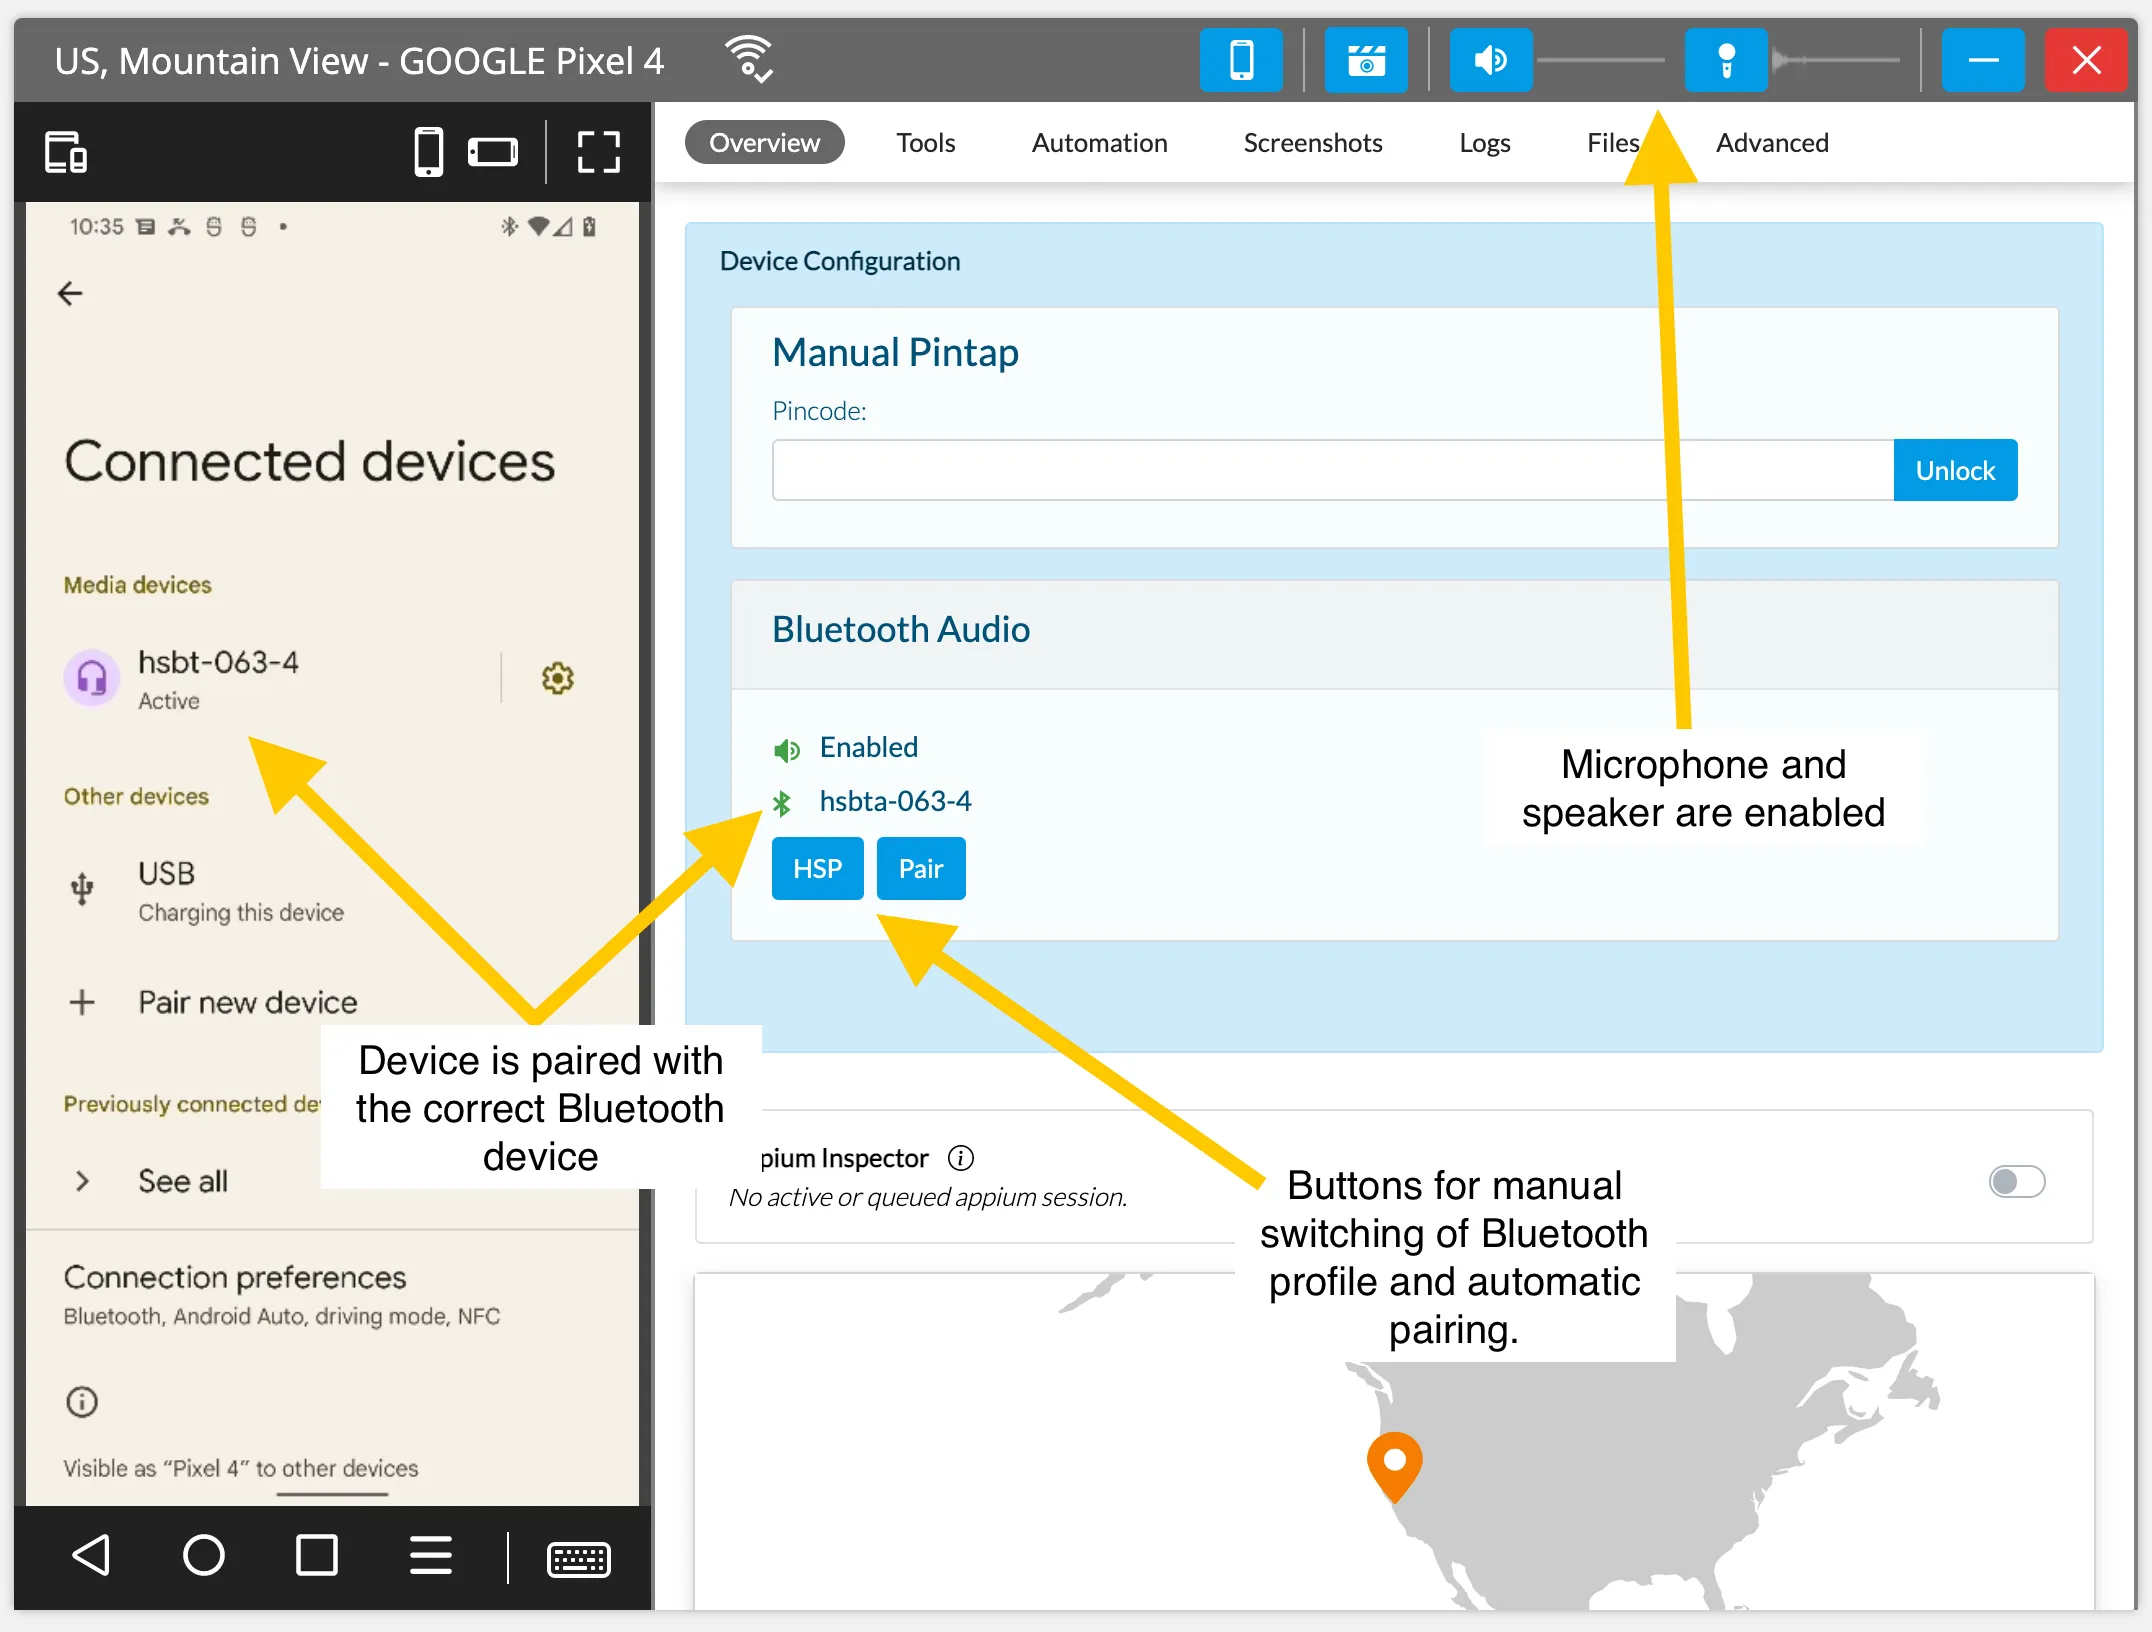
● HSP/A2DP profile button (Android only): Force activates the Bluetooth profile displayed on the button. More info below under the “Bluetooth Profiles” section of this document. NOTE: The button displays the mode the device will switch to, not the currently enabled mode.
● Pair: Attempts to automatically execute the Bluetooth pairing process between the mobile device and the Bluetooth device.
● Advertise: Available only with HSBT Gen 2. A manual alternative if the pair button does not respond as expected; triggers the device to advertise so that a pairing can be made.
● Accept: Available only with HSBT Gen 2. The second half of the manual pairing alternatives; the Accept button confirms a pairing that has been selected on the mobile device and shares that confirmation with the Bluetooth hardware in the mobile device’s environment
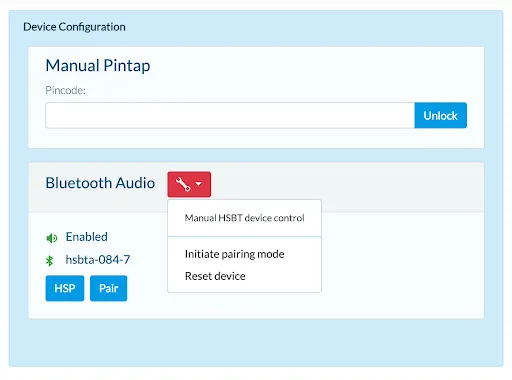
● Red Wrench: This settings dropdown menu is only available to users with Bluetooth permissions enabled by an administrator or HeadSpin contact. The wrench menu offers two administrative actions:
- Initiate pairing mode: a failsafe method to enter pairing mode with the device, should the other UI options not get a response
- Reset device: wipes the pairing list of the device and restores its Bluetooth configurations to factory settings
Note that the Advanced tab will always display the name of the Bluetooth hardware device to which the mobile device must be paired. Typically, this information can also be found in the Overview section, but this is its default location.
Differentiating Bluetooth Hardware Versions
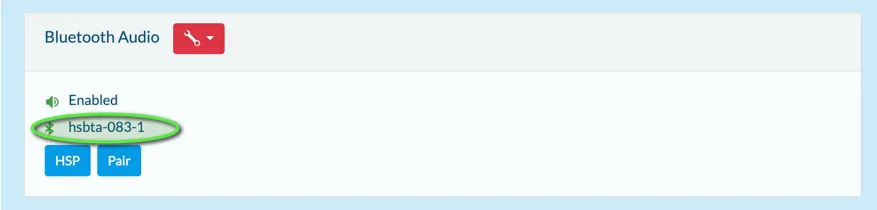
The most definitive way to differentiate between HSBT hardware versions is to note the name of the Bluetooth hardware device. If you are using HSBT gen 1, the Gen 1 hardware can typically be identified with a naming convention of HSBT-XXXXXX or HSBTA-XXXXX. Example:
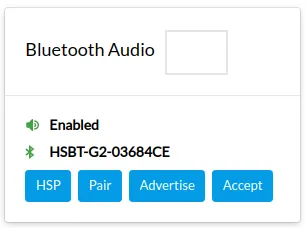
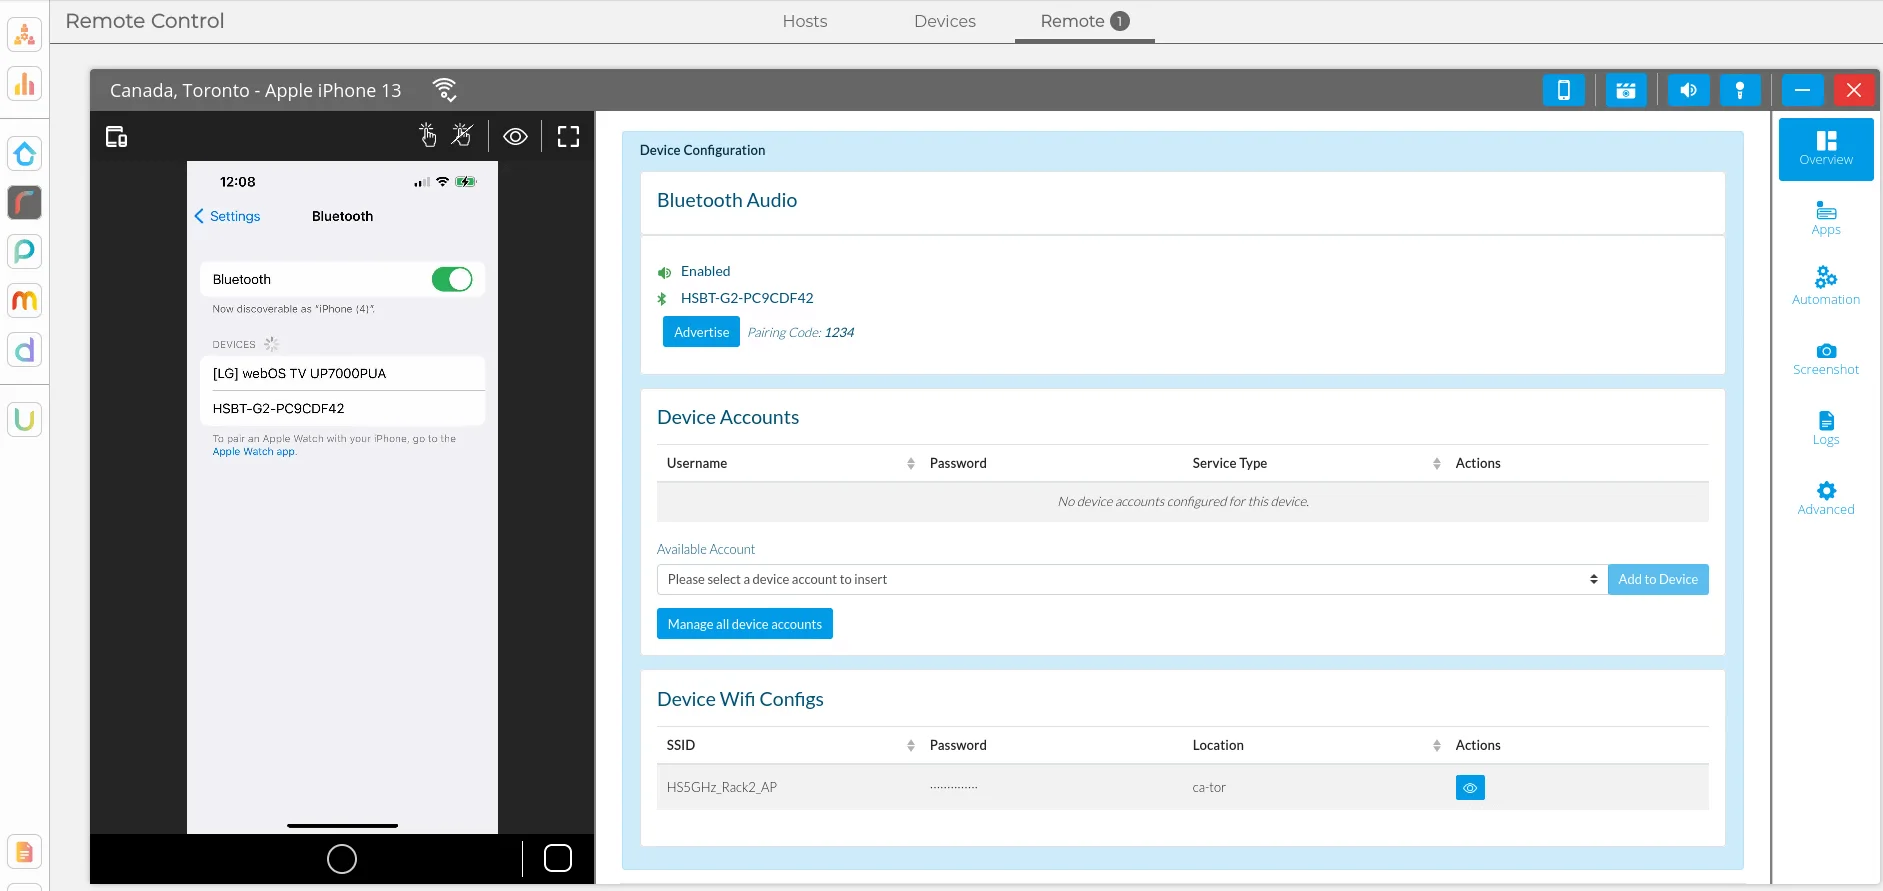
If you are using HSBT gen 2, this new hardware typically follows the naming convention of HSBT-G2-XXXXXX. You will also see the ‘Advertise’ and ‘Accept’ buttons if your selected Bluetooth hardware is of the second generation. Example:
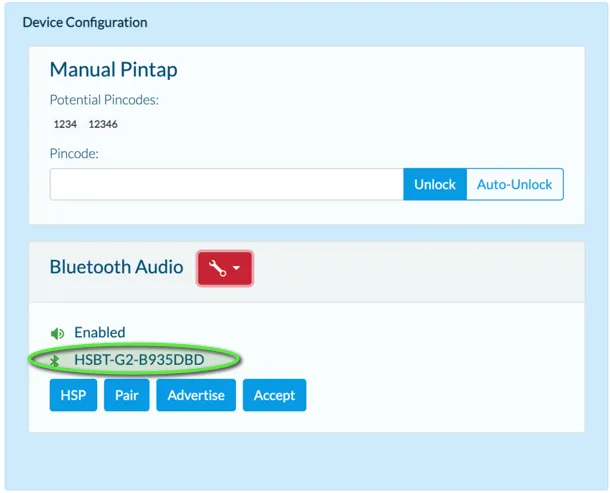
HSBT gen 2.1 devices are named like HSBT-G2-PXXXXXXX.
Basic Setup for HSBT Gen 1
1. Ensure the phone or mobile device has audio support enabled. It should have a speaker icon next to its name in the devices list.
2. For Android devices, you can first try automatic pairing using the steps below (for iOS or other non-Android mobile devices, skip to step 3):
- A) On the mobile device in your Remote Control view, navigate to the device’s Bluetooth settings menu and verify that the device/phone has been paired with the correct BT hardware (naming conventions for Gen 1 vs. Gen 2 are described above under the “Differentiating Bluetooth Hardware Versions” section). To confirm the correct BT device to pair to your mobile device, look for the BT hardware name in the Device Configuration panel of the Overview tab or in the Advanced tab.
B) Navigate to the Device Configuration panel (see Bluetooth User Interface section above) and click on the “Pair” button.
3. If automatic pairing fails or if you are using a non-Android mobile device, try pairing the device manually. Please note this option is only available if your administrator or a HeadSpin contact has given you the necessary Bluetooth permissions; if you do not have these permissions, please contact us for assistance.
To manually pair a mobile device:
A) Locate the name of the Bluetooth device to pair in the Advanced tab of the Remote Control view.
B) Navigate to the Device Configuration panel. Click the red wrench button and select "Initiate pairing mode" from the dropdown menu.
C) On the mobile device, navigate to the Bluetooth settings and follow the device’s pairing steps to ensure it is paired with this Bluetooth hardware.
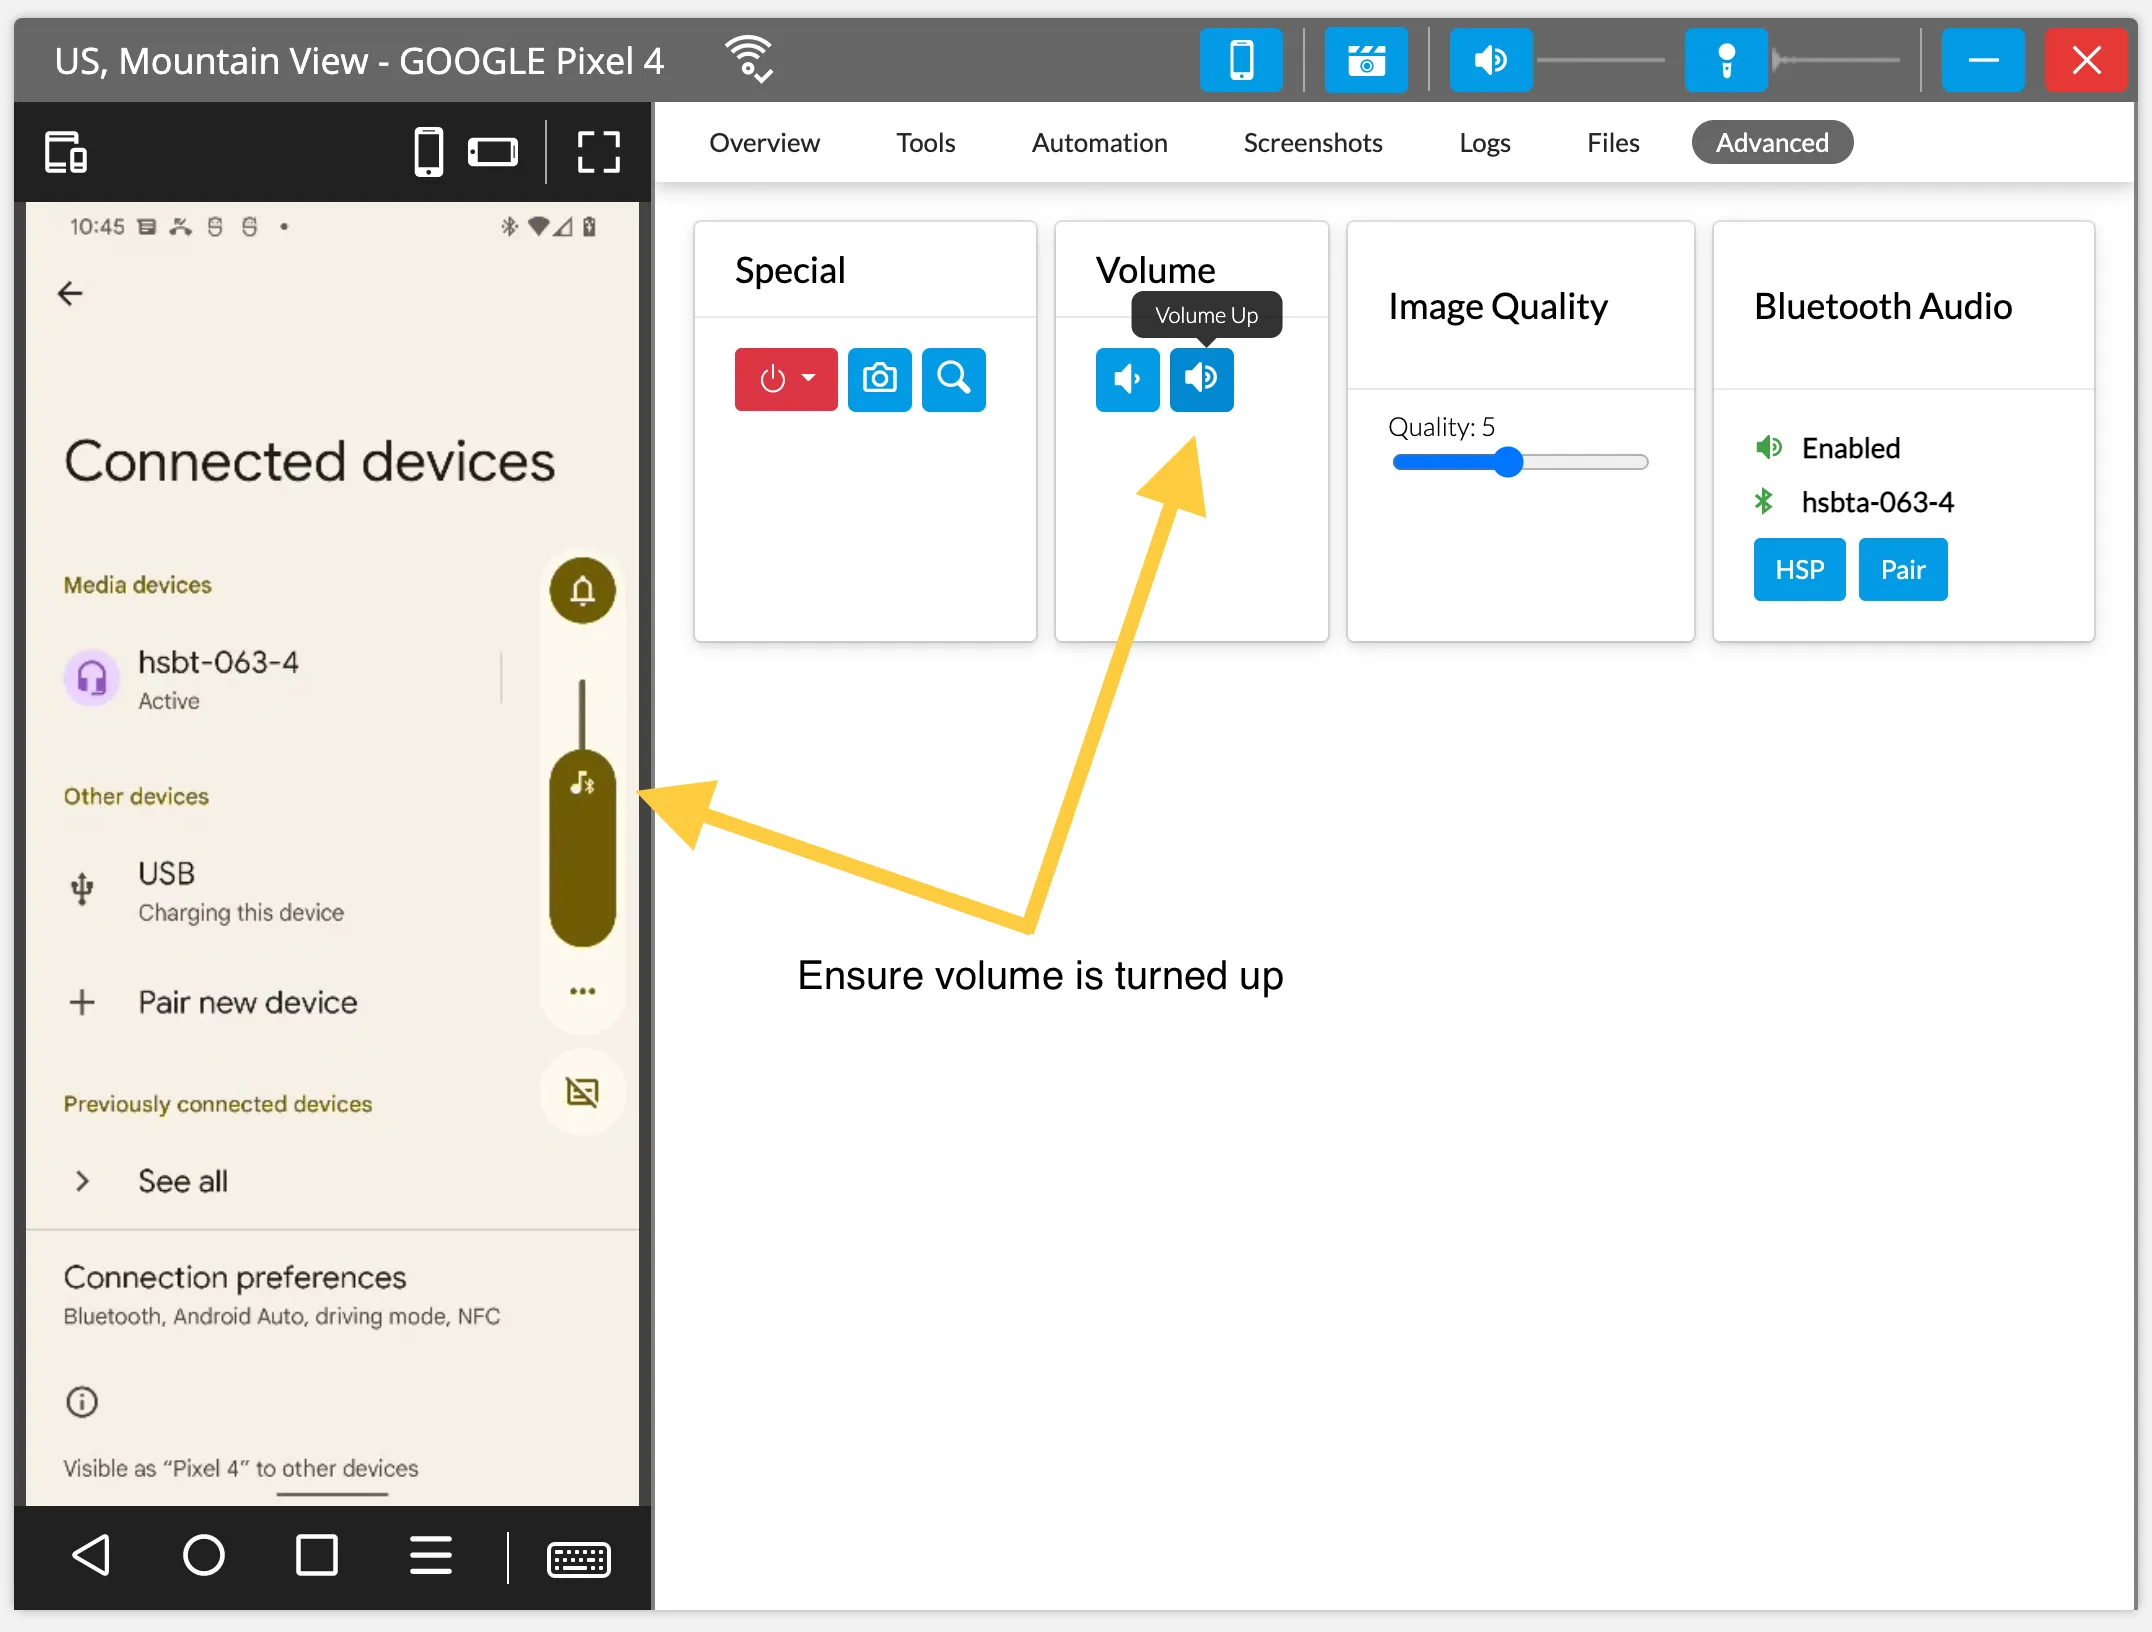
Once the device is paired, either automatically or manually, enable the speaker and microphone in the Remote Control UI by clicking the “Start Speaker” and “Start Microphone” buttons in the upper-right corner.
Make sure the volume on the device is turned up. This can be done via the device settings on the mobile device itself or using the volume controls found in the Advanced tab of the Remote Control view.
NOTE: It is highly suggested that you do NOT unpair a mobile device once it has been paired with Bluetooth hardware. This can lead to several scenarios that are difficult to troubleshoot and can cost you valuable time! For security reasons, once a Bluetooth device has been paired with a phone or mobile device it can no longer be discovered (via Bluetooth discovery) or paired to unless explicitly instructed via UI/GUI. This is to prevent eavesdropping by other Bluetooth or mobile devices. If you unpair (or "forget") the Bluetooth device from the mobile device, you will not be able to reconnect until the Bluetooth device is reset. If for some reason you do find a mobile device needs to be paired again or paired with another Bluetooth device, please contact HeadSpin for support.
If you have Bluetooth permissions granted by an administrator, select “Reset device” from the red wrench dropdown menu, then follow the steps for manual pairing as detailed above.
If you have any questions or concerns about the pairing process, we recommend contacting HeadSpin for assistance.
Basic Setup HSBT Gen 2
The steps for pairing a mobile device to a Gen 2 Bluetooth hardware device are identical to the steps for pairing a Gen 1. For automatic pairing setup of a Gen 2 device, refer to the steps under the Basic Setup HSBT Gen 1 section above. If the automatic pairing fails or if you are using a non-Android mobile device, you can perform a manual pairing with an HSBT Gen 2 Bluetooth device using the steps below:
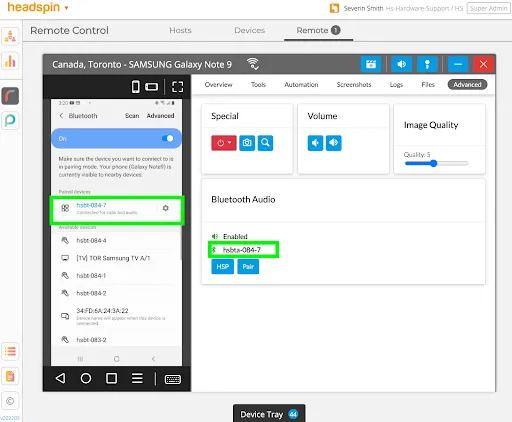
1. In the Remote Control view of the mobile device you would like to pair, navigate to the Advanced tab and find the box labeled Bluetooth Audio. Click the “Advertise” button.
2. On the mobile device, navigate to Bluetooth settings -> Pair new device. Look for a Bluetooth device that has the correct <code class="dcode">HSBT-G2-xxxxxxx name</code>. The device name must be the same as shown in the Advanced tab, as with the example from the image below.

3. In the Bluetooth Audio tab, click the “Accept” button. This will instruct the Bluetooth hardware’s audio board to accept pairing in the next 60 seconds.
4. On the mobile device, initiate pairing by clicking on the HSBT-G2-xxxxxxx name.
5. Verify that the mobile device has been paired with the Bluetooth hardware.
6. As with Gen 1 setup, once the mobile device is paired, enable the speaker and microphone via the Remote Control UI and ensure the volume of the device is turned up.
Again, it is highly recommended that you do NOT unpair a mobile device once it has been paired with Bluetooth hardware. For security reasons, Bluetooth audio hardware will not advertise or accept pairing requests unless explicitly instructed via UI/GUI (or CLI interface) per the manual steps outlined above.
HSBT Gen 2 devices should not be paired with more than one device at a time.
In order to pair HSBT Gen 2 with a new mobile device, it should first be instructed to “Forget all previously paired devices” and then follow the steps for automatic or manual pairing with the mobile device. You can do this from the mobile device’s interface using Remote Control or via the HeadSpin CLI. If you have questions or concerns, please contact HeadSpin for assistance.
Basic Setup HSBT Gen 2.1
HSBT Gen 2.1 currently does not have an auto pair option via the "pair" button, like the previous models. Pairing can only be done manually, but the process should be much quicker and simpler than the previous versions.
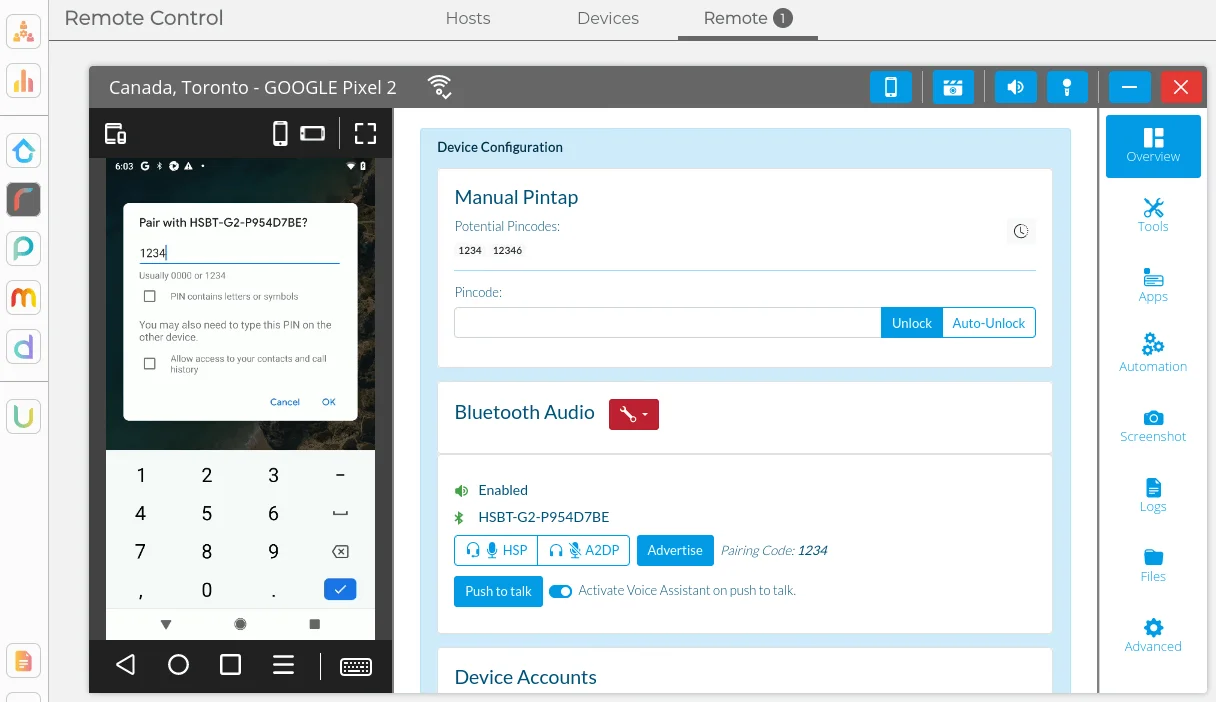
On Android devices, if the device is not yet paired, the platform will initiate pairing when the device is started. This will raise a system pop-up asking to complete the pairing.
Pressing "Pair & connect" will bring up pairing dialog where you will be prompted to enter the PIN which is shown in the UI. After this, the pairing will complete.
To force initiation of pairing, you can press the red wrench button and select "Reset device".

On Apple devices, if the device is not yet paired, then the platform should also initiate pairing when the device is started. If it does not then you can go on the device to "Settings", "Bluetooth", and click on the corresponding HSBT gen2.1 device entry in the as specified in the "Device Configuration", "Bluetooth Audio" section of the UI.
The Apple device will request you enter the PIN. Enter the value of "Pairing Code" shown in the UI.
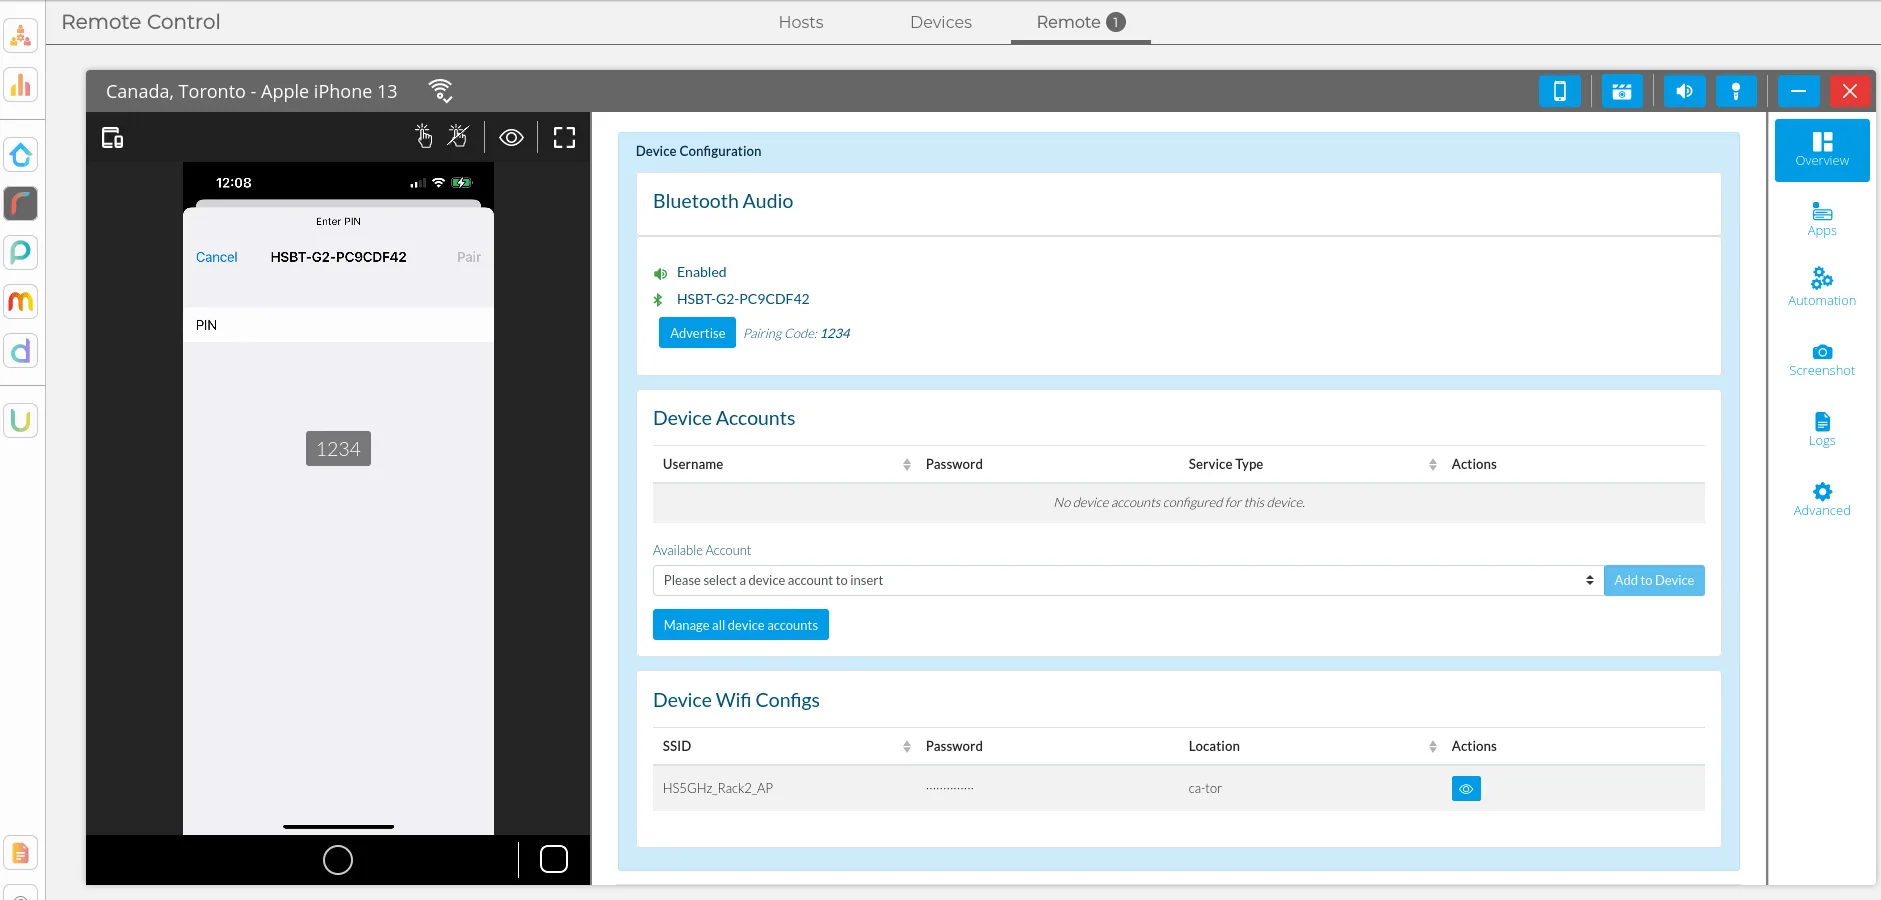
The pairing will be established then.

By default HSBT gen2.1 devices will not advertise themselves except when initially connecting to a device. If you do not see the expected HSBT gen2.1 device in the bluetooth device list then you can try pressing the "Advertise" button in the "Device Configuration", "Bluetooth Audio" section of the UI to force it to do so.
Bluetooth Profiles and Limitations
Currently, the use of HSBT/audio testing is not available on BYOD devices. We recommend using shared/dedicated devices hosted in the HeadSpin cloud for audio testing, but if you have questions, you are welcome to contact HeadSpin for more details.
In general, when using Bluetooth audio (both in the HeadSpin platform and on any consumer Bluetooth headphones) there are two possible Bluetooth profiles that can be active. Bluetooth profiles can be thought of as different modes of functionality for the Bluetooth connection which cause different technical and audio properties to be available. The device's operating system and the app in use will determine which profile Bluetooth will utilize. This process is invisible to users, but for developers and testers, the ability to trigger the change between these profiles can be essential for application audio debugging and also for the proper function of your app. The two profiles are:
- A2DP Profile (Advanced Audio Distribution Profile): This can be thought of as a high quality audio mode, e.g., for listening to music and watching movies. It is high audio quality and stereo but has increased latency and does not include microphone support.
- HSP/HFP Profile (Headset or Hands Free Profile): This can be thought of as the phone call mode. It is lower audio quality and mono, but it has lower latency and supports the microphone. Note that the audio quality in HSP is significantly lower, to the point most people can detect the difference.
Bluetooth Profiles: Manual Profile Switching (Android only)
For many applications, the Bluetooth profile system works as expected for both audio in and out. However, please note that Bluetooth audio does not function as an exact one-to-one replacement of physical/wired audio due to the design of Bluetooth profiles.
The most common issue testers encounter regarding audio on our platform is an application failing to request HSP/HFP profile activation when recording audio. This may be caused by a bug in the app under test, or it may simply be a function of the limitations of Bluetooth audio. We have created a workaround to manually trigger the Bluetooth profile switching that may provide a resolution in these cases and allow you to continue testing. (Note that this feature currently is only available for Android mobile devices.) With this feature, users can force the HSP/HFP profile to activate, causing the Bluetooth microphone to become the default microphone for the mobile device. For applications relying on the default microphone, this will substitute the Bluetooth microphone for the physical device microphone, which will then allow users to perform microphone audio testing as expected on remote devices. The ability to switch profiles also provides more flexibility with testing for audio input/output debugging.
To use this profile switching capability:
- Launch a Remote Control session on a mobile device with audio enabled.
- Navigate to the Bluetooth controls (either the Device Configuration panel in the Overview tab or the Advanced tab, as discussed in the Bluetooth UI section above).
- Click the profile button to toggle the Bluetooth profile. Note that this will also change the text displayed on the button, so given the current configuration of the device, the button may either display HSP or A2DP.
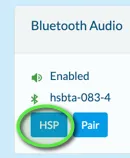
NOTE: The button displays the profile the device will switch to, NOT the currently enabled profile. This means if the button displays “HSP”, as in the picture above, the device is currently using A2DP and can be switched to HSP, and vice versa.
If you have further questions about the behavior of your test devices and audio testing, please take a look at our Audio Troubleshooting document.
Bluetooth Profiles: Push to talk (Android only)
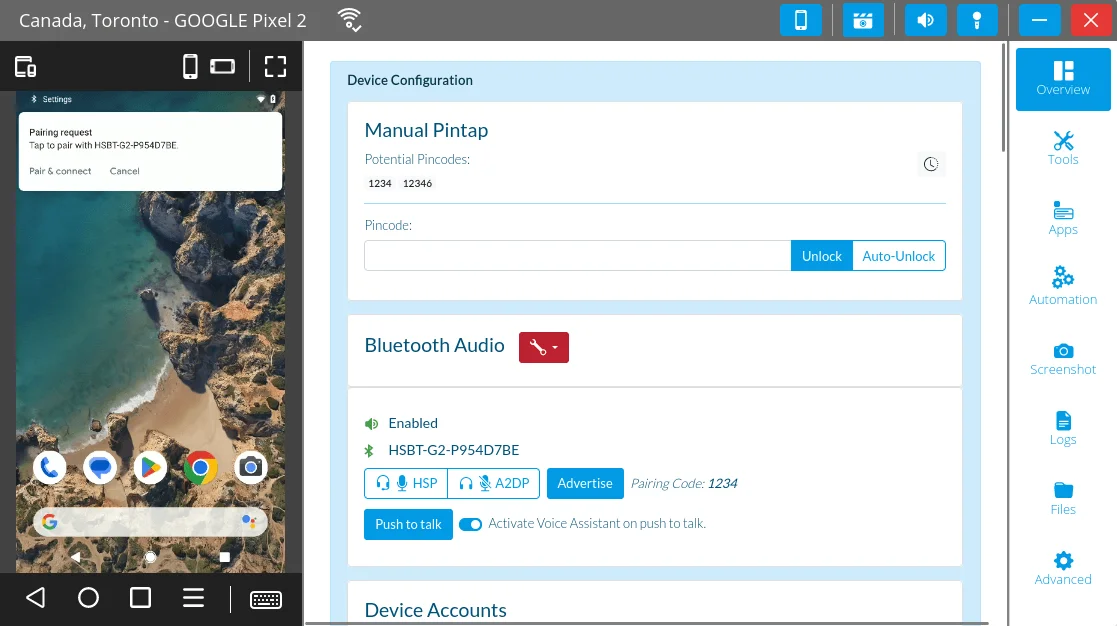
Some applications, such as the Google Voice Assistant, require switching into the HSP profile in order to inject audio, and then switching back to the A2DP mode in order to hear the response. In order to facilitate these interactions, a "Push to talk" button has been added to the UI. It can be found in the "Bluetooth Audio" card in the "Overview" tab.

To use "Push to talk" follow these steps:
1. Make sure the Microphone and Speaker are activated as described in Audio User Interface section.
2. Press and hold the "Push to talk" button.
3. A request will be sent to switch the device into HSP mode.
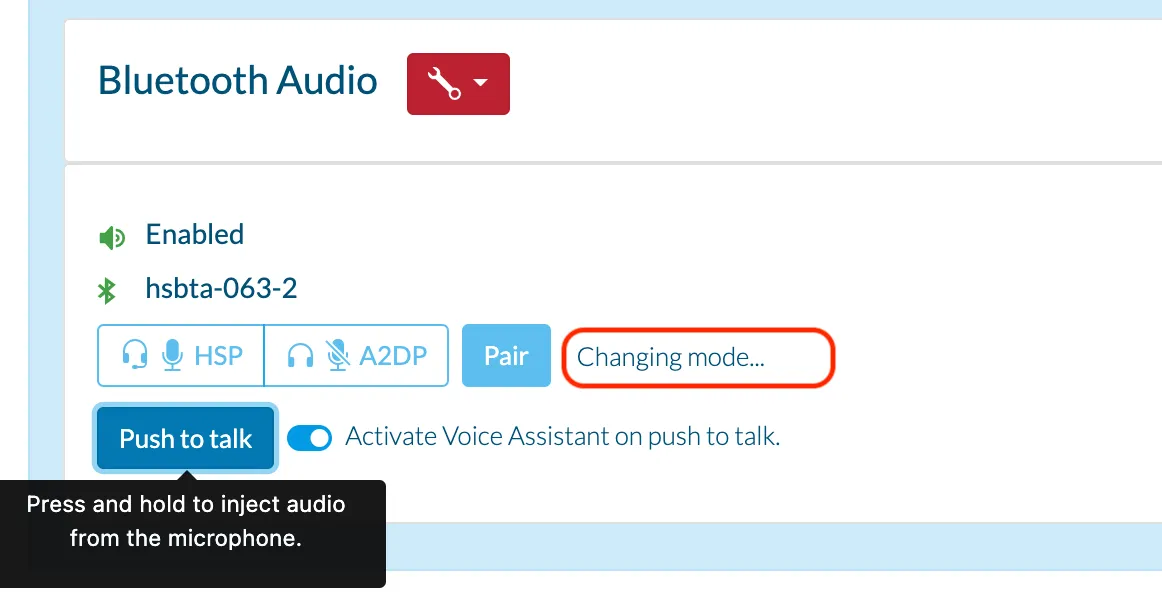
4. While switching profiles, the UI will display "Changing mode...". When the switch completes the HSP profile will be highlighted. This should normally only take about one second but could take longer on some devices.
5. If the "Activate Voice Assistant on push to talk" toggle is switched on (this is the default), then the Voice Assistant will be activated after the profile switch is completed.
6. When you see the "Ready for voice input!" message, speak into your microphone and continue to hold the "Push to talk"
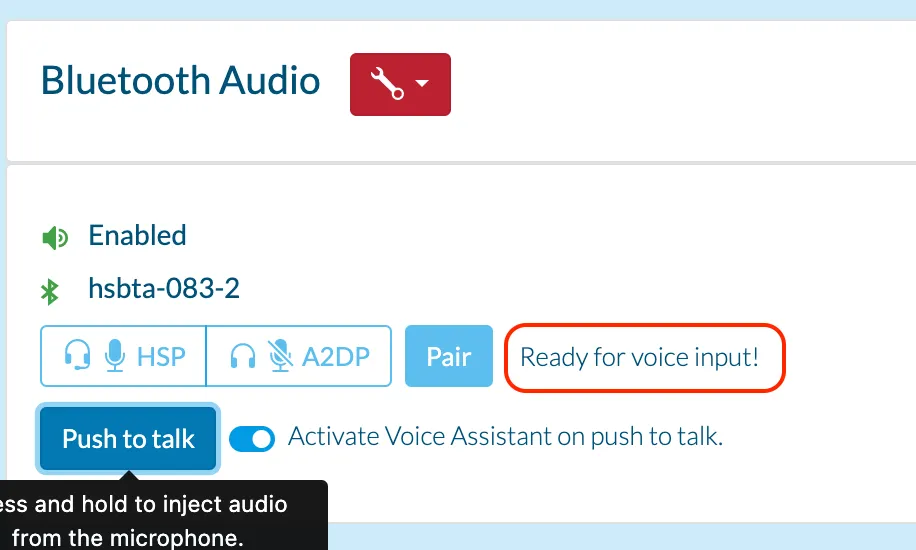
7. When finished speaking, release the "Push to talk" button.
8. The device will be sent a request to switch back into A2DP mode and any audio output by the device will be audible after. For example, the audio response from the Voice Assistant.
